We thought we'd kick off the developer blog with a discussion of how we build our levels. Our plan is to break this into a three part series spanning multiple blog posts. We hope you enjoy it.
PART 1 – GENERATING ENEMIES
A. TOOL SPOTLIGHT – LUA
Although StarBreak® servers are written in C++, we implement our enemy AI in Lua, an interpreted scripting language. Using Lua, rather than implementing AI directly in C++, offers a large number of advantages:
- Dynamically typed: Static typing is vital for writing and maintaining large code bases but when you need to develop and iterate quickly, static typing quickly becomes a burden. Because fast iteration is a key to building compelling AI, the tradeoff here is well worth it.
- Interpreted: This again allows for fast iteration since the server does not need to be recompiled (or linked) for changes to be tested. In some cases, the server does not even need to be restarted.
- Garbage Collection: Freeing the designer from having to think about memory management is another way iteration can be made faster and less error prone. Lua also uses an incremental garbage collector which avoids the stalls that can happen with traditional garbage collectors and really hurt real-time applications such as games (Flash, I’m looking at you).
- Embeddable: More than any other language I’ve encountered, Lua is designed to be embedded into other applications. Integrating and sharing data across the language divide, while not exactly intuitive, works very well.
- Flexible: Lua’s concept of “meta-mechanisms” makes it possible to really mold the language to suit the needs of your application and hide a lot of details when scripting.
- Fast enough: Obviously, no scripting language is going to match C++ for performance, but Lua is fast enough that enemy AI is not a large percentage of the CPU usage of the server.
As a result, enemy AI development is less complex and shields the designer from being bogged down with data structure manipulation and maintenance to focus on what is important: building compelling enemy behaviors.
The details of how we integrate Lua and code examples are beyond the scope of this post, but we will next discuss how enemy behaviors are generally implemented.
B. IMPLEMENTING ENEMY BEHAVIORS
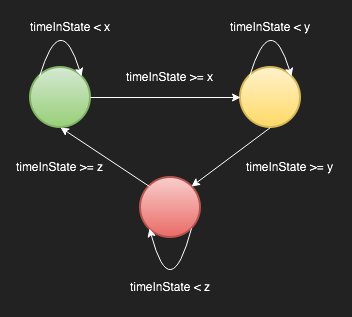
The bulk of our enemy behaviors are designed as one or more finite state machines. A finite state machine consists of a number of states and transitions between those states. A finite state machine can only exist in one particular state at any given time (the current state). The finite state machine can transition from the current state to other states when one or more prerequisites are met. A simple example of a finite state machine is a traffic light. If the light is in the green state, after x time has elapsed, the finite state machine will transition to the yellow state. After y time has elapsed, the finite state machine will transition to the red state. And after z time has elapsed, the finite state machine will transition back to the green state. This state machine can be visualized as a directed graph:
Admittedly, the state machines we typically implement are more complicated than the above example, but there are plenty of simple enemies that may actually be less complicated than the traffic light example. The primary way we add additional complexity is that our transition criteria are based on many different factors, including:
- Time in current state
- Proximity to the player(s)
- Proximity of other enemies
- Proximity and configuration of terrain
- Remaining health of the enemy
- Time between events
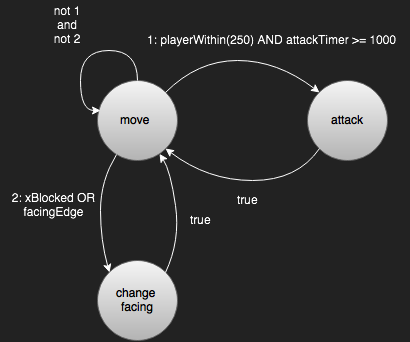
As a more concrete example, StarBreak includes patroller enemies that patrol a given platform or ledge and attack a player that is within a specified range and at a specific frequency. But we also want to make sure that patroller is constrained within the geometry and doesn’t go flying off the platform or ledge on which they are standing. Therefore, if the patroller bumps up against a wall or is facing an edge of a ledge or platform on which they are standing, we will want the patroller to turn around and move in the other direction. This very simplified behavior can be expressed by this example state machine:
An example enemy from StarBreak® that is very similar to the above approach is the Trooper in the underground base. You can see in this animated gif that the Troopers patrol their respective platform or ledge and engage a player when it is within range:
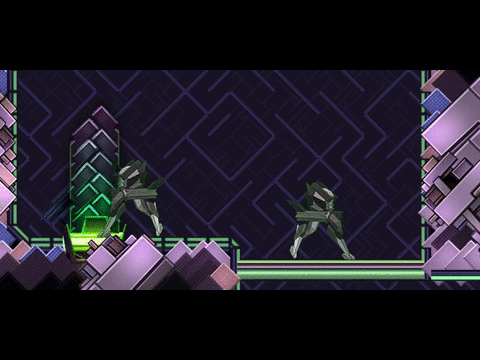
One thing you might have noticed from the above example, is that the Trooper's triggers are slightly different than the patroller we outlined in the above state machine. Namely, the Trooper won't become hostile until they are facing their target. So as you can see, there are lots of interesting ways to vary fairly basic behaviors to achieve our desired results.
In some instances, a single state machine might not be sufficient to control all aspects of a particular enemy. Our solution is to assign different aspects of the enemy to different state machines that are executed serially. For example, an enemy might include a state machine that specifies its movement behaviors and a second state machine that specifies its attack behaviors. The boss in the Temple of the Lost, for example, includes three state machines: one that controls its movement, one that controls its projectile attacks, and one that specifies parameters for its arms (the arms being comprised of both a claw and multiple segments). The arm claws themselves have their own state machine that control their behavior once the boss specifies how the claw is supposed to behave for a period of time (e.g., attack a player or attach to a wall) and the arm segments also have their own state machine that specify how and when they spawn additional monsters (adds) into the fight. Needless to say, at any given time, there are a lot of state machines running in pseudo-realtime to give the players the StarBreak® experience.
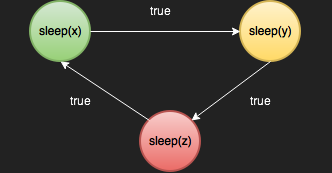
In the traffic light example, we continually check to see if the proper amount of time has elapsed before transitioning to the next state. As you might surmise, doing this simultaneously for hundreds of objects can have performance implications as we are checking to see if the proper amount of time has elapsed on each update. To solve this, we can defer execution of one or more state machines for a prescribed period of time. Essentially, we put the state machine to sleep for a period of time and when the state machine wakes up, the state machine has been transitioned to the proper state. If we change the stop light example to implement deferred execution, the revised state machine might look something like this:
Another element of our system that we leverage quite a bit is that our state machines can be defined outside the context of any one enemy for broad ranges of behaviors and incorporated into multiple different enemies without having to duplicate code. For example, there are over a dozen different types of Scavenger enemies in the Graveyard that are specified using only three different types of state machines: One for melee Scavengers, one for cover Scavengers and one for patrolling Scavengers.
Next week we will discuss level building, where we will showcase what we do with all these enemies, after we have crafted their behaviors.
If you are interested in learning more about Lua, please check out Lua.org and Wikipedia. If you are interested in taking an even deeper diver, Programming in Lua by Roberto Ierusalmischy is the only book you’ll ever need on Lua.